
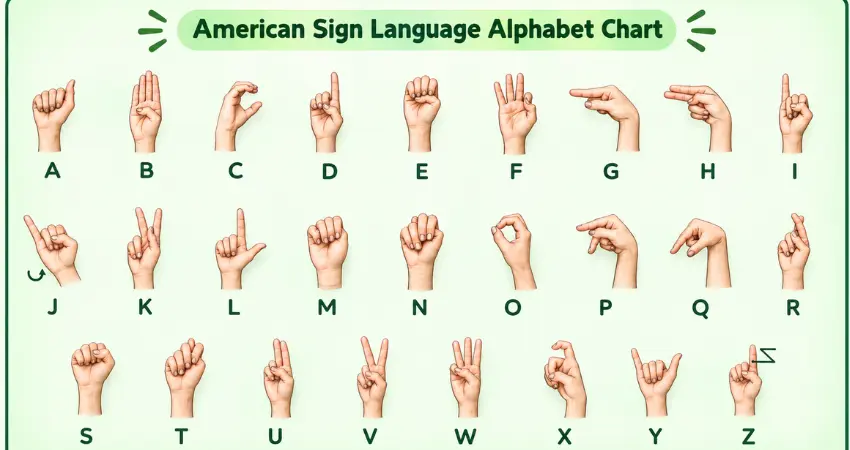
The ASL alphabet is a set of 26 handshapes used to represent the letters of the English alphabet in American Sign Language (ASL). Learning these handshapes is one of the first useful steps for people who want to practice ASL, communicate with Deaf people, spell names, or recognize fingerspelled words.
However, there is an important distinction: the ASL alphabet is not the same thing as the ASL language itself. ASL has its own vocabulary, grammar, facial expressions, body movements, and sentence structure. Fingerspelling is one part of ASL and is commonly used when spelling English words, names, places, abbreviations, and other terms.
Below is a complete A–Z ASL fingerspelling guide with a clear explanation of each letter and practical tips for learning the alphabet.
What Is the ASL Alphabet?
The ASL alphabet, also called the American manual alphabet, uses one distinct handshape for each of the 26 letters from A through Z. The letters are produced with the dominant hand and are generally made in the signing space in front of the body.
Fingerspelling allows a signer to represent an English word letter by letter. For example, a person's name may be fingerspelled when there is no established ASL sign for it. NIDCD explains that fingerspelling is part of ASL and is used to spell out English words, including proper names.
It is also worth remembering that fingerspelling is more than simply "spelling English with your hands." Research and educational materials from Gallaudet describe fingerspelling as an integrated part of American sign language that can interact with ASL vocabulary and language structure.
ASL Alphabet A–Z Chart
A in ASL
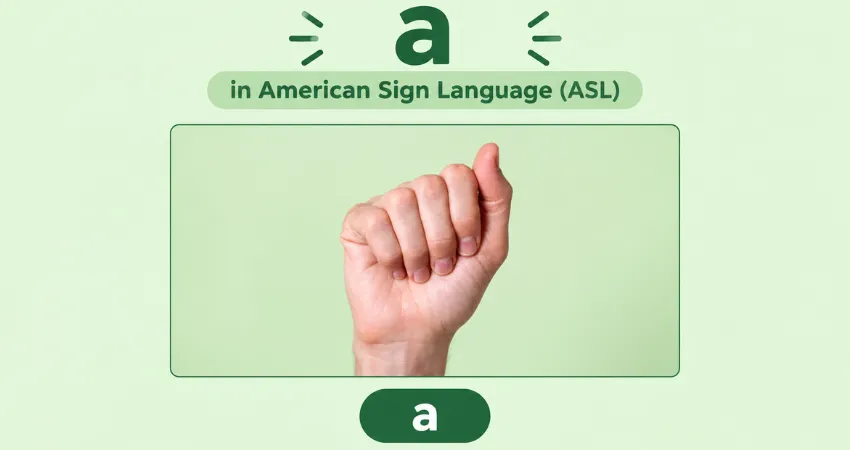
The ASL letter A is made with a closed, fist-like hand. The fingers are folded into the palm while the thumb rests along the side of the hand.
The A handshape is easy to confuse with S, especially when you are first learning the alphabet. One useful detail is the position of the thumb. In the standard A handshape, the thumb is positioned along the side rather than across the front of the fingers.
Learning tip: Practice A and S next to each other so you can quickly notice the difference in thumb placement.
Your image: Use the provided A image directly below this section.
B in ASL
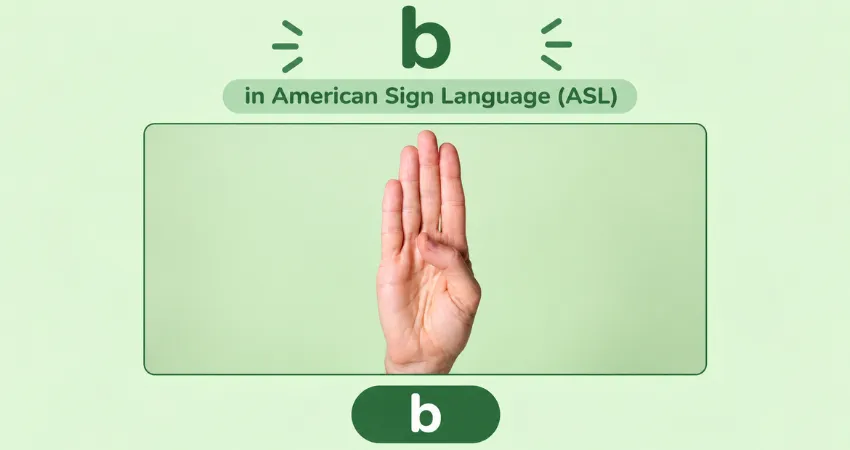
The ASL letter B is formed by extending the four fingers upward and keeping them together. The thumb is folded across the palm.
The hand should look relatively flat and organized rather than having the fingers spread apart. Beginners often concentrate on the four extended fingers but forget to position the thumb correctly.
Learning tip: Keep the four fingers together and relaxed. Avoid spreading them like a four-fingered wave.
Your image: Use the provided B image directly below this section.
C in ASL
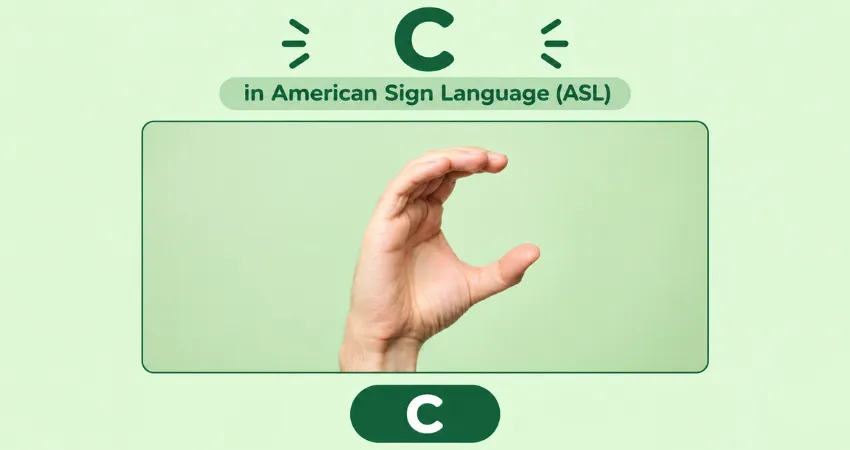
The ASL letter C uses a curved handshape that resembles the written capital letter C.
The thumb and fingers curve toward one another without touching completely. The shape should remain open rather than closing into an O.
This makes C and O useful letters to practice together. C has an opening, while O forms a much more complete circular shape.
Learning tip: Imagine that you are holding a small round object between your fingers and thumb, but leave the hand open enough to create a clear C.
D in ASL
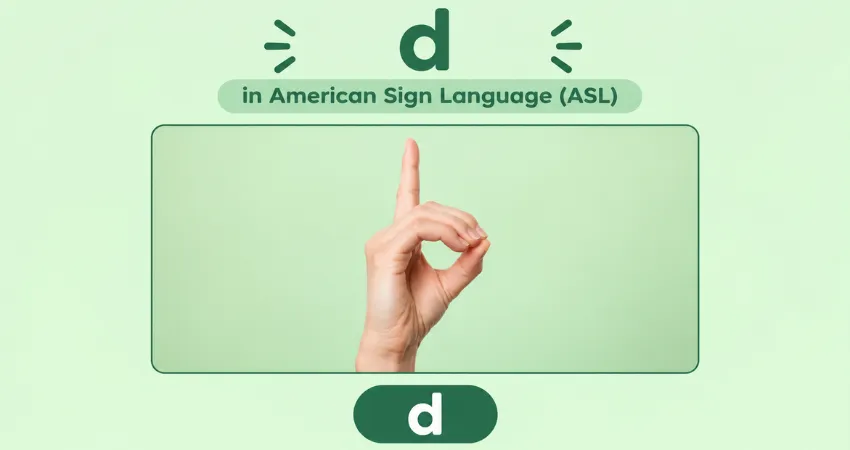
The ASL letter D uses the index finger extended upward. The thumb and remaining fingers form a rounded shape beneath it.
D is one of the letters that beginners can confuse with F, so pay attention to which finger is extended and how the remaining fingers are positioned. Handspeak specifically notes the D/F distinction as a common learner issue.
Learning tip: Practice D and F as a pair instead of learning them separately.
E in ASL
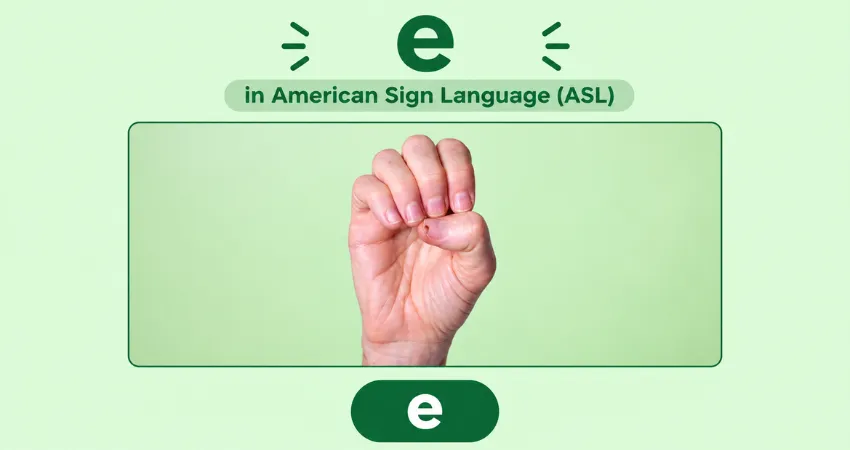
The ASL letter E is formed by curling the fingers toward the palm while positioning the thumb across the fingers.
Because the hand is compact, E can initially look similar to other closed handshapes. The position of the fingertips and thumb helps distinguish it.
Learning tip: Do not squeeze the hand too tightly. A relaxed hand makes the shape easier to recognize.
F in ASL
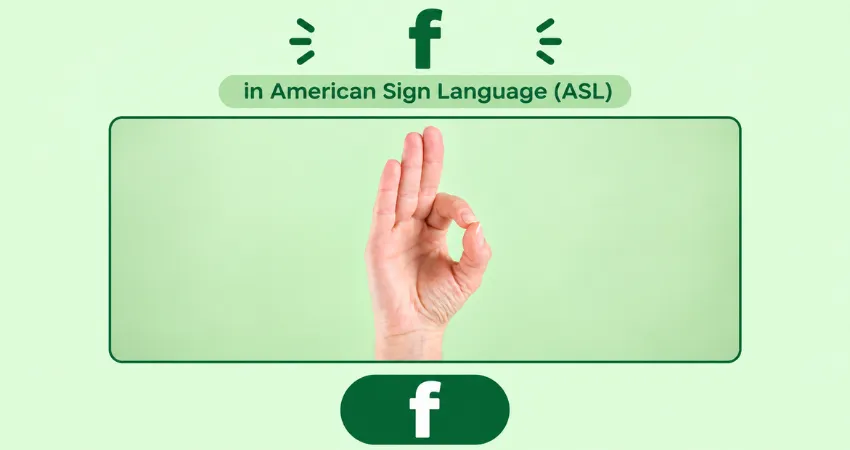
The ASL letter F is formed when the thumb and index finger touch to create a small circle. The remaining three fingers are extended.
This is one of the more recognizable ASL alphabet handshapes, but beginners sometimes confuse it with D.
Learning tip: Remember F = thumb and index make the circle. Keep the other three fingers clearly visible.
G in ASL
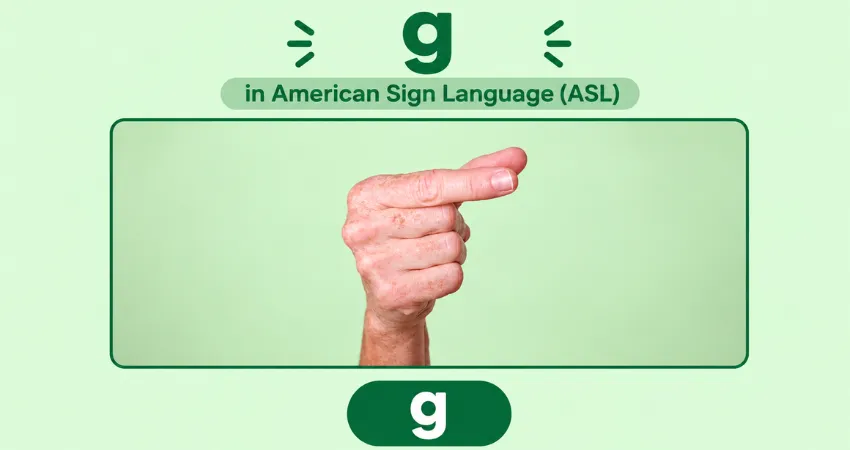
The ASL letter G is formed by extending the index finger and thumb horizontally while the remaining fingers are closed.
Palm orientation is particularly important with G. Handspeak notes that the orientation of G can have variations in natural fingerspelling because neighboring letters can influence how the hand moves or changes position.
Learning tip: Focus first on the index finger and thumb. Once the handshape feels natural, practice G inside complete words.
H in ASL
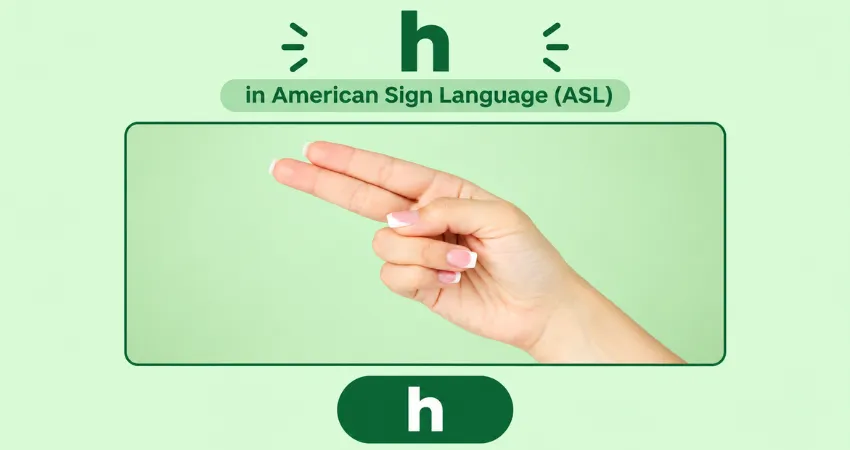
The ASL letter H uses the index and middle fingers extended together horizontally. The other fingers are folded.
Unlike V, the two extended fingers stay together rather than forming a wide separation.
Learning tip: Practice H and V together. The same two fingers are important in both, but their position and separation are different.
I in ASL
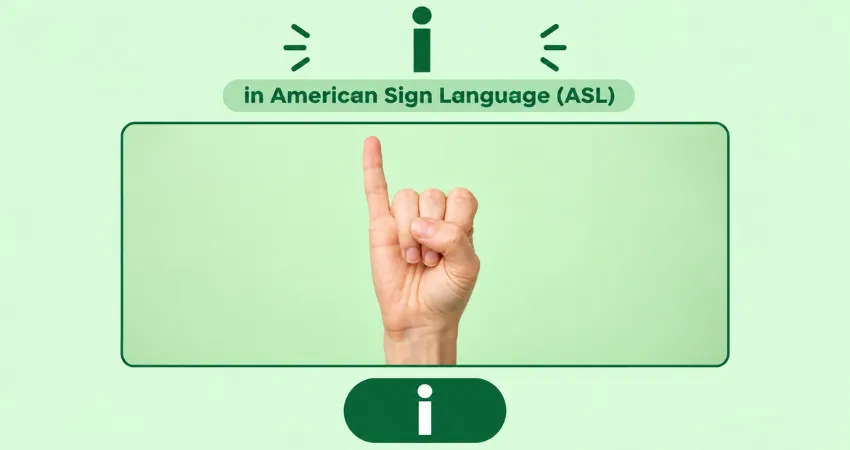
The ASL letter I is made with a closed hand and the pinky finger extended upward.
The extended pinky is the main feature that makes I easy to identify.
Learning tip: Think of I as the "pinky-up" letter. Make sure the other fingers stay folded.
J in ASL
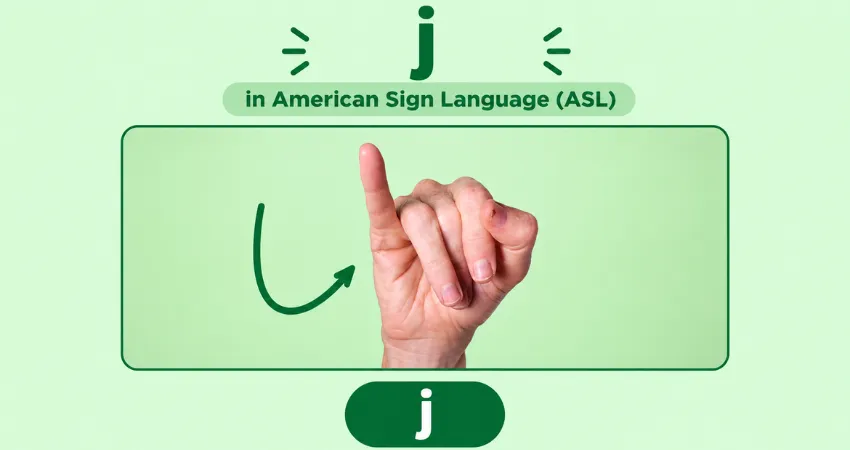
The ASL letter J starts with the handshape used for I, with the pinky extended. Instead of holding the hand still, the pinky moves through a J-shaped path.
This means J is different from most letters in the alphabet because movement is part of the letter.
Fingerspelling references identify J and Z as letters that involve movement rather than simply holding a static handshape.
Learning tip: First make the I handshape correctly. Then practice drawing the J motion smoothly.
K in ASL
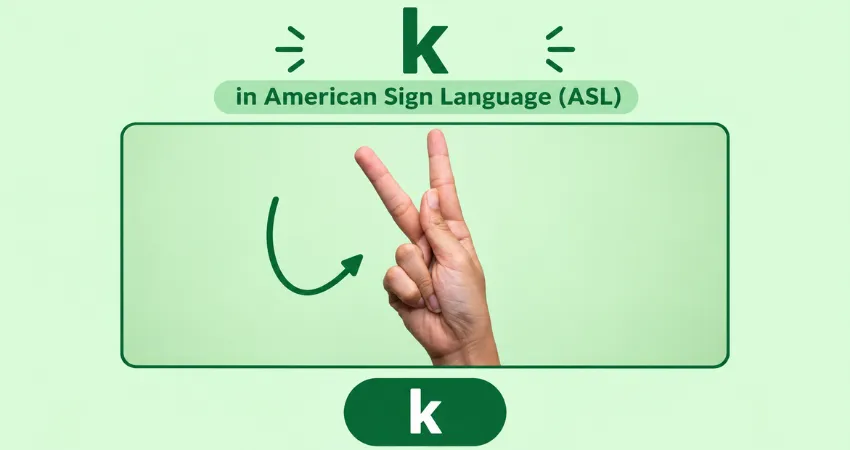
The ASL letter K uses the index and middle fingers extended upward with the thumb positioned between them.
K is commonly compared with P because they use a related handshape. Their orientation is different.
Handspeak specifically recommends paying attention to the different palm orientations of K and P.
Learning tip: Learn K and P together and practice changing the orientation without changing the basic finger arrangement.
L in ASL
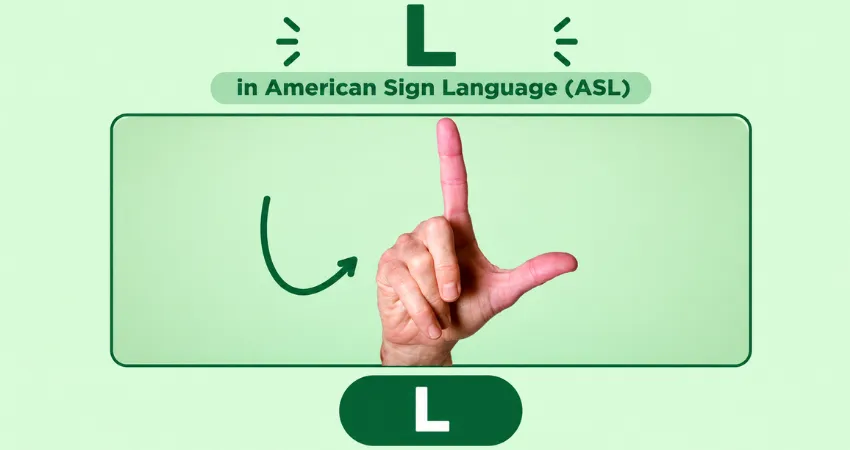
The ASL letter L is one of the easiest alphabet handshapes to remember. Extend the thumb and index finger at right angles to create an L shape.
The remaining fingers stay folded.
Learning tip: Think of the written capital L. Your thumb and index finger create a similar visual shape.
M in ASL
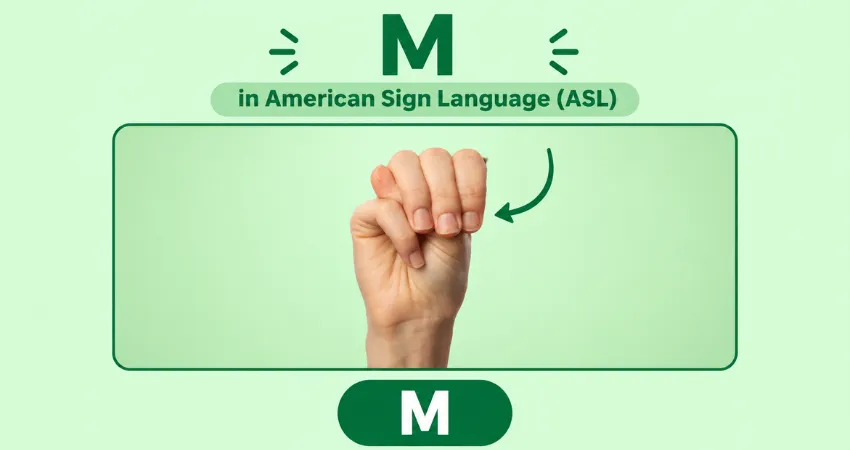
The ASL letter M is formed by placing the thumb underneath three folded fingers.
M is one of the letters that beginners often mix up with N and T because all three involve the thumb being positioned among folded fingers.
Handspeak specifically recommends paying attention to the thumb when distinguishing M from N.
Learning tip: Practice M, N and T as a group. Comparing them makes their differences much easier to remember.
N in ASL
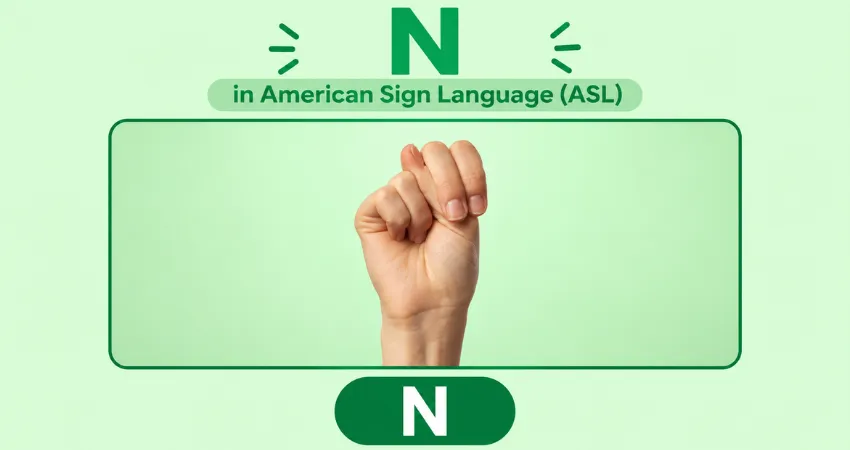
The ASL letter N is similar to M but uses a different number of fingers positioned over the thumb.
The thumb is tucked underneath two folded fingers rather than three.
Learning tip: If M and N look almost identical to you, concentrate on the thumb and count the fingers folded over it.
O in ASL
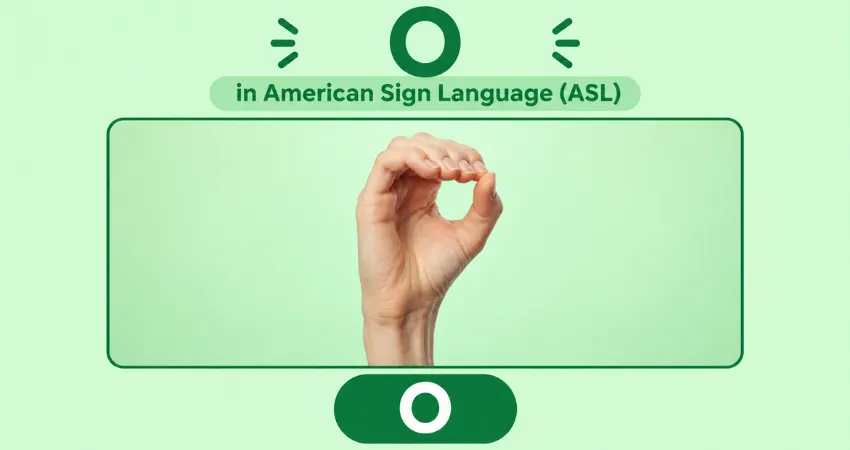
The ASL letter O is formed by bringing the fingers and thumb together into a rounded shape that resembles the capital letter O.
The hand forms a closed circular outline.
O is especially useful to compare with C because both use a curved handshape.
Learning tip: C is open; O closes the shape into a rounded form.
P in ASL
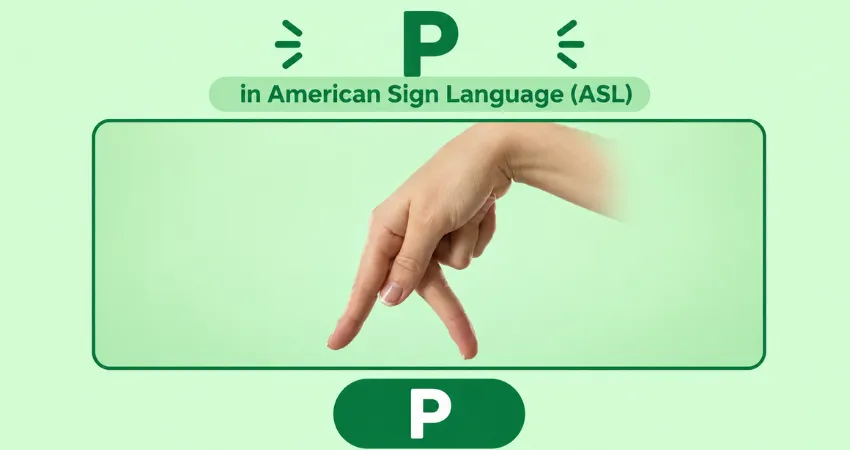
The ASL letter P has a handshape related to K but is oriented downward.
The index and middle fingers form the main part of the handshape, while the thumb is positioned between them.
Learning tip: If you know K, use it as a starting point and focus on the change in orientation. K and P are commonly confused by beginners.
Q in ASL
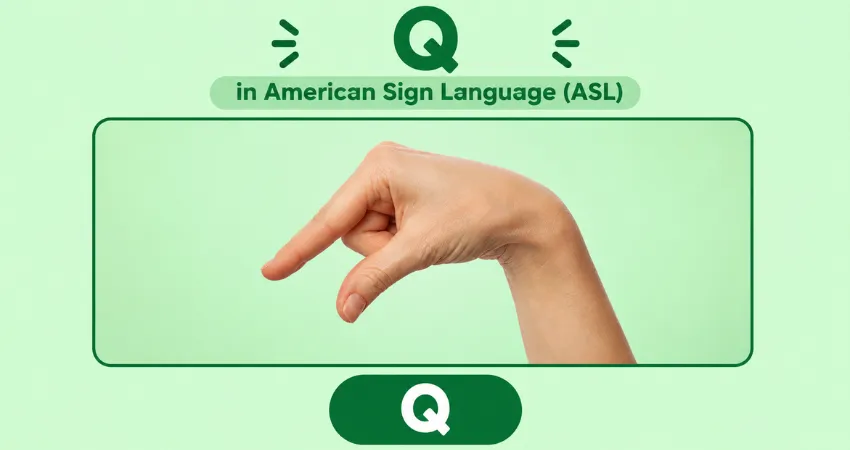
The ASL letter Q is formed with the index finger and thumb pointing downward while the other fingers remain folded.
It can be easier to recognize when you focus on the direction of the extended fingers rather than trying to memorize the entire hand at once.
Learning tip: Compare Q with G. Both use the index finger and thumb, but their orientation is different.
R in ASL
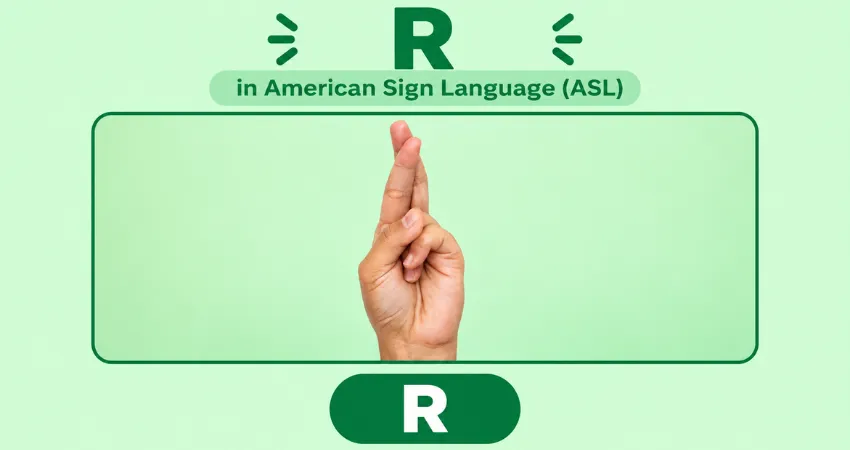
The ASL letter R is made by crossing the index and middle fingers while the other fingers are folded.
The crossed fingers are the key visual feature.
Learning tip: Think of the crossed fingers as your main memory cue for R.
S in ASL
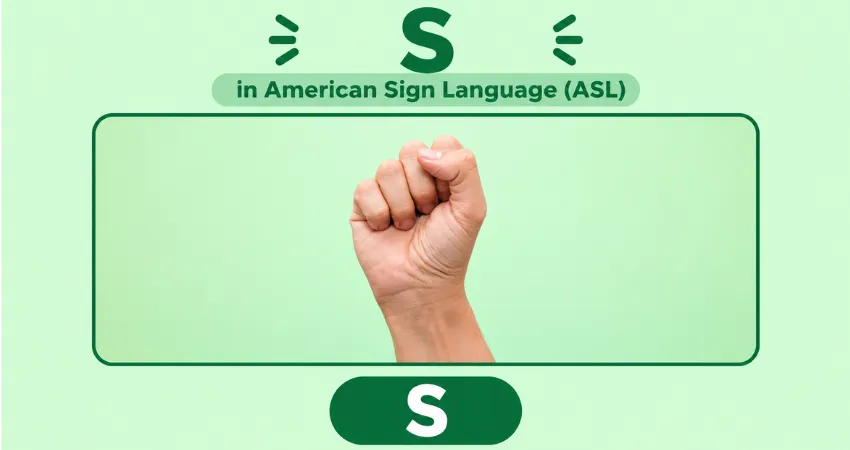
The ASL letter S uses a closed fist with the thumb positioned across the front of the fingers.
S is often confused with A by beginners because both use a closed hand.
The thumb is the detail to watch. Handspeak specifically points learners toward the thumb when distinguishing A and S.
Learning tip: Practice A → S → A → S repeatedly until the thumb positions become automatic.
T in ASL
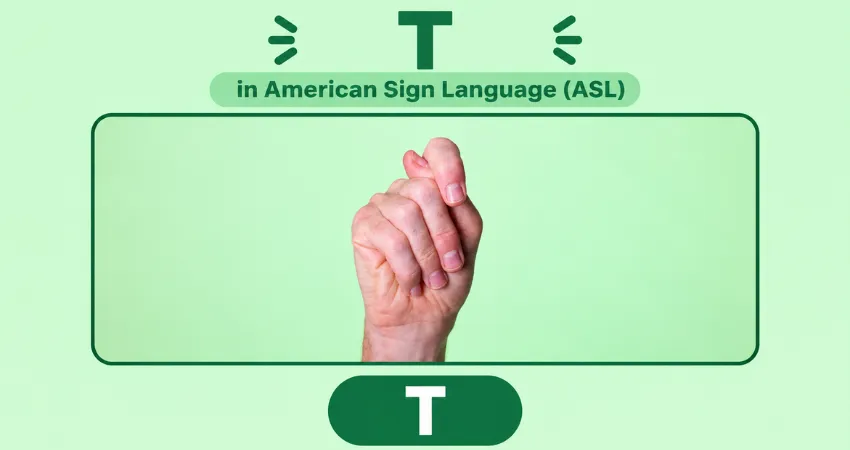
The ASL letter T is made by placing the thumb between the index and middle fingers while the remaining fingers are folded.
T can look similar to M and N when you are learning the alphabet quickly.
Learning tip: Practice T, M and N together and focus on how many fingers are positioned over or around the thumb.
U in ASL
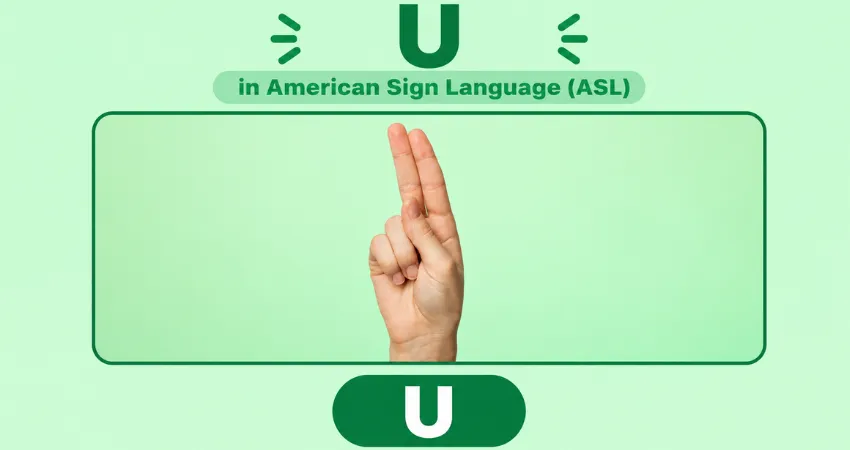
The ASL letter U is made by extending the index and middle fingers upward while keeping them together.
The other fingers are folded.
U and V are a natural pair for practice because they both use the index and middle fingers.
Learning tip: For U, keep the two fingers together. For V, separate them.
V in ASL
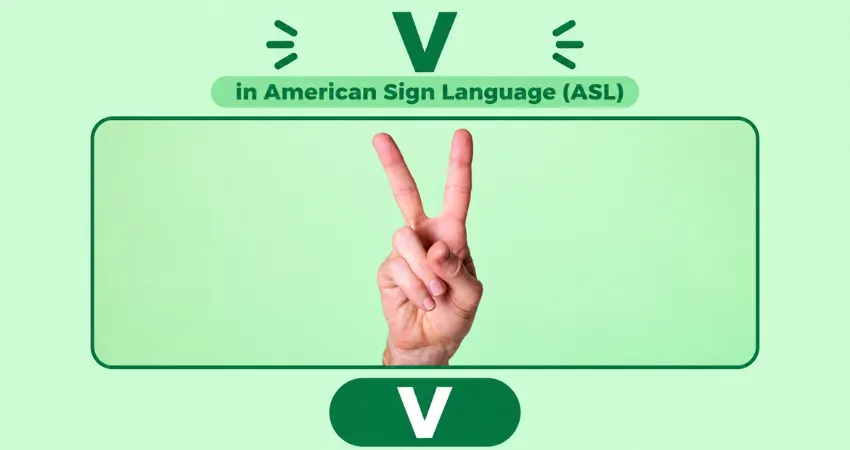
The ASL letter V uses the index and middle fingers extended upward and separated into a V shape.
The remaining fingers stay folded.
Learning tip: Remember the written letter V. The two extended fingers visually reproduce that shape.
W in ASL
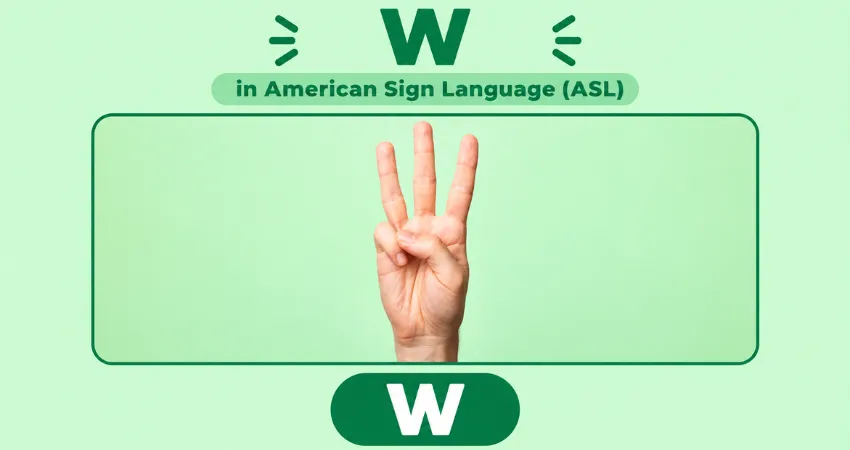
The ASL letter W is formed by extending three fingers—the index, middle and ring fingers—while keeping the other fingers folded.
The three extended fingers create the visual impression of a W.
Learning tip: Think three fingers = W. Keeping those fingers separated enough to be visible makes the handshape clearer.
X in ASL
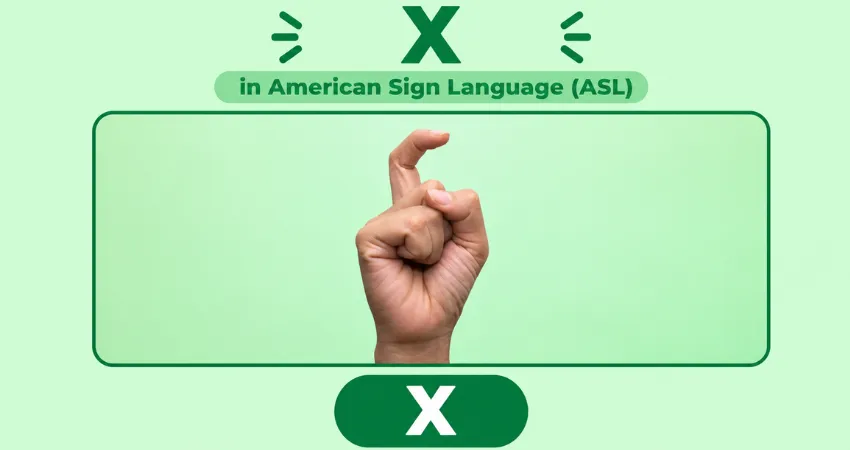
The ASL letter X uses the index finger bent into a hook-like shape while the other fingers remain folded.
Unlike a straight index-finger handshape, X depends on the distinctive bend of the index finger.
Learning tip: Focus on the curved index finger. The hook is the most important feature to remember.
Y in ASL
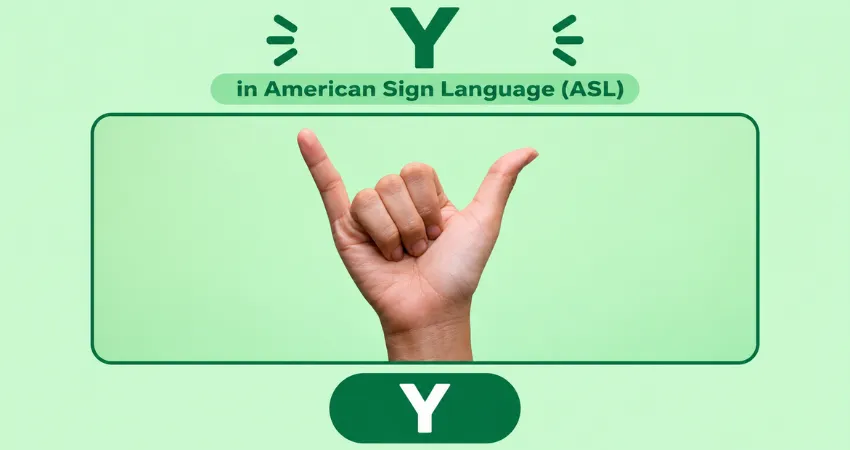
The ASL letter Y is formed by extending the thumb and pinky while the middle three fingers remain folded.
It creates a recognizable "telephone" or Y-shaped hand position.
Learning tip: Remember thumb + pinky = Y.
Z in ASL
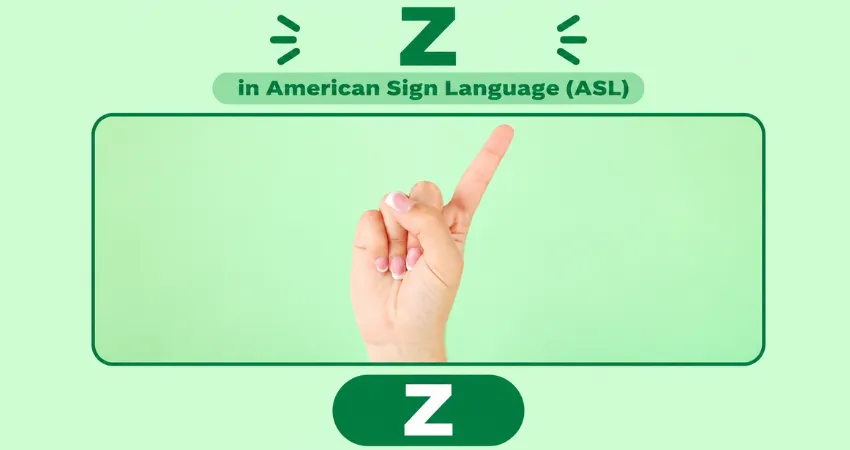
The ASL letter Z is different from most alphabet letters because it uses movement.
The index finger is extended and moves through the shape of a Z in the signing space. The movement is normally produced from the signer's perspective, similar to writing the letter.
Handspeak describes Z as a one-hand "1" handshape moving in a zig-zag path to create the letter.
Learning tip: Practice the movement slowly at first. Once the path feels natural, increase your speed without making the Z difficult to recognize.
ASL Alphabet A–Z: Letters That Beginners Commonly Mix Up
You do not have to memorize all 26 handshapes at exactly the same speed. Some letters naturally cause more confusion than others.
A and S
Both use a closed hand, but the thumb position distinguishes them.
D and F
These handshapes can look similar when viewed quickly. Pay attention to the extended finger and the thumb-index relationship.
K and P
The basic handshape is related, but the orientation changes.
M, N and T
These three are easiest to learn as a group because the thumb placement changes between them.
U and V
Both extend the index and middle fingers. U keeps them together; V separates them.
I and J
Both use the pinky, but J adds movement.
G and Q
Both involve the index finger and thumb, but their orientation differs.
Practicing confusing pairs is usually more useful than repeatedly going through A–Z without checking your hand position.
How to Learn the ASL Alphabet Faster
Learning the alphabet is much easier when you practice recognition and production together.
1. Start With Small Groups
Instead of trying to memorize all 26 letters in one sitting, divide them into groups:
A–F
G–L
M–R
S–X
Y–Z
Once one group feels comfortable, move to the next.
2. Practice Similar Letters Together
Use pairs and groups such as:
A / S
D / F
K / P
M / N / T
U / V
I / J
G / Q
This teaches you to notice the details that actually distinguish the handshapes.
3. Fingerspell Your Name
Your own name is a useful first practice word because you already know the correct sequence of letters.
Start slowly and make every handshape clear. Later, work on smoother transitions.
4. Practice Short Words
After your name, try simple words such as:
CAT
DOG
BOOK
HOME
SCHOOL
WATER
HELLO
Do not worry about speed at first. Accuracy is more important than rushing.
5. Practice Reading Fingerspelling
Learning ASL fingerspelling has two sides: producing letters and recognizing letters when someone else signs them.
Gallaudet's fingerspelling standards include recognizing and using fingerspelled words for different purposes, including words without established sign equivalents.
Is the ASL Alphabet the Same as American Sign Language?
No.
The ASL alphabet is only one part of American Sign Language.
ASL is a complete natural language with its own linguistic structure. Gallaudet University explicitly notes that ASL is not a manual version of English, while NIDCD describes ASL as a language with its own ways of expressing grammatical functions.
Fingerspelling is used within ASL for particular purposes, but fluent ASL communication is not simply spelling every English word letter by letter.
For example, a beginner might assume that learning the 26 letters means they have learned ASL. It does not. The alphabet gives you an important foundation, but learning ASL also requires vocabulary, grammar, signing space, facial expressions, body movement and interaction with the Deaf community.
When Is Fingerspelling Used in ASL?
Fingerspelling can be useful in several situations.
Names
People's names may be fingerspelled, particularly when introducing someone or when a person's name does not have an established sign.
Places
City, state, country and other place names may sometimes be fingerspelled.
New or Unfamiliar Terms
A signer may fingerspell a word that is unfamiliar to the other person or does not have an immediately appropriate sign.
Technical Terms
Specialized vocabulary, abbreviations and terminology can be fingerspelled depending on the context.
Clarification
Fingerspelling can also help clarify a word or establish a reference during communication.
Gallaudet's educational standards describe fingerspelling as having several formal and informal uses rather than being limited to one situation.
One Hand or Two Hands: How ASL Fingerspelling Works
The ASL manual alphabet shown in this guide uses one hand.
This is an important point because not every sign language uses the same alphabet. For example, British Sign Language (BSL) has a different fingerspelling system. Sign languages are not universal, and their alphabets and linguistic structures can differ from one country or community to another.
So if someone asks for the "sign language alphabet," it is useful to know which sign language they mean.
For this guide, the focus is specifically American Sign Language (ASL).
ASL Fingerspelling Tips for Beginners
Keep these simple rules in mind while practicing:
Use your dominant hand consistently.
Keep your hand in a comfortable signing position.
Make each letter clearly before trying to increase speed.
Pay attention to thumb position.
Practice letters that look similar together.
Learn to recognize fingerspelling as well as produce it.
Do not expect the ASL alphabet alone to teach you ASL grammar.
Use visual examples and, when possible, observe experienced or fluent signers.
Practice short words before attempting long words.
Do not focus only on memorizing the shapes—practice transitioning between them.
Fingerspelling can look very different when performed slowly as a teaching exercise compared with natural, fluent fingerspelling. Research from Gallaudet notes that neighboring letters can influence one another during fluent fingerspelling, a process known as coarticulation.
ASL Alphabet A–Z Practice Chart
For quick revision, practice the sign language alphabet in this order:
A → B → C → D → E → F → G → H → I → J → K → L → M → N → O → P → Q → R → S → T → U → V → W → X → Y → Z
Then reverse it:
Z → Y → X → W → V → U → T → S → R → Q → P → O → N → M → L → K → J → I → H → G → F → E → D → C → B → A
Reverse-order practice is useful because it stops you from relying only on memorized alphabetical sequence.
Frequently Asked Questions About the ASL Alphabet
How many letters are in the ASL alphabet?
There are 26 handshapes corresponding to the 26 letters of the English alphabet in the ASL manual alphabet.
Is ASL fingerspelling the same as sign language?
No. Fingerspelling is part of ASL, but ASL is a complete language with its own vocabulary and grammar.
What is the hardest letter in the ASL alphabet?
There is no single letter that is objectively hardest for everyone. Beginners commonly need extra practice with visually similar groups such as A/S, D/F, K/P and M/N/T.
Which ASL letters use movement?
J and Z are the two alphabet letters that prominently use movement as part of their production.
Can I spell my name in ASL?
Yes. You can use ASL fingerspelling to spell an English name letter by letter. Fingerspelling is commonly used for proper names.
Is the ASL alphabet universal?
No. Sign languages differ between countries and communities. ASL is primarily used in the United States and parts of Canada, and its fingerspelling alphabet should not be assumed to be the same as BSL or another sign language.
Can I learn ASL just by memorizing A–Z?
Memorizing the alphabet gives you a useful starting point, but it does not mean you have learned ASL. You also need to learn ASL vocabulary, grammar, facial expressions, movement, signing space and conversational skills.
Final Thoughts
Learning the ASL alphabet A–Z is a practical first step for anyone beginning to explore American Sign Language. The 26 handshapes give you the ability to fingerspell names, places and other English words, while also helping you become familiar with the visual nature of ASL.
Start slowly, pay close attention to the thumb and finger positions, and spend extra time on letters that look alike. Once the individual handshapes become familiar, practice moving smoothly from one letter to the next and gradually work toward recognizing fingerspelled words at normal speed.
Most importantly, remember that fingerspelling is one component of ASL, not the entire language. Building real ASL ability means going beyond the alphabet and learning how the language is actually used.
Resources